Thursday, 12 January 2012

Improve canter departs


The other week I was asked how to improve canter departs. Here are some thoughts on the subject.

First of all, improving the canter depart is related to whether the horse has a decent canter or not. In my work as a riding instructor I've met a lot of Icelandic horses and trotters who do not have a decent canter, even when the horse moves freely without a rider. It is not my goal to discuss this issue in this blog entry.

I assume therefore that the horse whose canter depart we seek to improve has a nice canter when, for example, he moves freely in the pasture. The first step then could be to have the horse strike off into canter from trot when given a signal to do so. Some horses can become very stressed when asked to canter in the beginning. One reason for this can be that canter is a gait the horse mainly uses for running away. If this is the case this is very important to deal with right away. But again, this is not an issue I'm going to linger on further here. Thus I assume the horse has a decent canter and does not get overly stressed about cantering.

One way to start building a cue for canter is to have the horse canter when lunging. The horse will only have to deal with its own body and not the rider's also. In the videos I've asked my horse Hagens Yeats to stay on a rather small circle (approx 15 m). If your horse is not used to cantering on the lunge when asked to, you will most likely be better off letting the horse move on a larger circle covering the whole with of the arena. Good footing and an enclosed area is always a good idea when introducing a horse to this kind of work. I've taught Yeats what the voice command “galopp” (Swedish for canter) means by simply asking him to increase the trot until he canters. As he now knows the spoken cue he don't have to speed up and can thus handle the smaller circle. As always you have to work the horse in both directions and on both leads.

As a little bonus, you can see in the first video how I switch direction in trot. I can ask Yeats to do this since I have attached the lunge line under his chin and I'm not using any side reins. A lunging cavesson where you attach the rope on the bridge of the nose would also work well.


When the horse can canter on command when lunging, in both directions of course, you can ask for the same when you ride the horse trotting on a large circle. To teach the horse to strike off in the canter lead you want on a straight line, you can use a broken line to help the horse find the right balance. For the horse to strike off into canter the horse needs to put weight on the outside legs, especially the outside hind leg. One way to put the horse in this balance is to ride a broken line along the long side of the arena. You bring the horse in from the track and as you ask the horse to return to the track (both hands to the track, your weight on the outside) the horse will shift his weight to the outside. This is when you ask for the canter. This exercise teaches the horse to listen to the rider's outside leg (which stays still against the horses side) as well as the rider's inside leg (which gives the impulse for canter by lightening its contact against the horse's side.)


To improve canter departs from walk the horse has to be in self carriage, that is light in the hand, and in proper balance that is elevated enough in the front. When the horse is in self carriage and in good balance you can ask for the canter with an reverse half halt on the inside rein. Reversed half halt means to start a half halt by lifting the hand, then lower it forwards, this will “open the door” for the horse's inside shoulder and the horse can step into the canter.

Reinforce with a light tap on the horse's inside shoulder if your horse needs clarification on what you're asking for when using the reverse half halt. To get the horse to understand a very small reverse half halt as Yeats does in the video, you must first offer such a small signal to the horse and support this small cue with a voice command or the whip on the shoulder as needed. The primary cue, in this case the reverse half halt with the inside hand, should never become large or heavy. Use a secondary supporting cue instead.

I suggest you also let your outside leg stay snugly against the horse's side for two reasons, the horse will recognise this as the preparatory cue for canter from the previous exercise, and as you progress into more advanced canter work like counter canter and two track in canter this snug outside leg will let the horse know which canter to strike off into and also which canter to stay in.


Some exercises that can improve the canter depart:
*) reining back – especially if the horse has a tendency to lean on the bit either in the depart to canter or in the downward transition after canter
*) shoulder in – to prepare the horse for a balanced canter depart from walk by strengthening the hind legs. In shoulder in the horse strengthens one leg a time
*) collected walk – will strengthen both hind legs at the same time

Thanks to Mark Stanton of Horsemanship Magazine for checking my spelling and grammar! All other errors are my own.

Thursday, 5 January 2012

A connected leg

To improve suppleness, it is important for riders to have some basic knowledge about their own anatomy, and in this post I thought to start with the legs.

In riding the rider's legs belongs to the horse's trunk. The legs should rest around it without squeezing, ready to support the aid from the hand and equally ready to send information about the horse's movement to the rider.

There are many who on a straight question as to where the hip joint is actually do not know the answer. To be able to improve our riding skills it is worth while to spend some time learning more about how our body works; where movement take place and what happens when we move. Let's take a closer look at how our legs are connected to our torso both bone wise and muscular. (Picture below comes from Wikipedia).


As you can see by the picture, there are several muscles in and around the pelvis attached to the femur. (There are 17 different muscles responsible for moving the femur in different directions, the other can be found here.)

The hip joint, like the shoulder joint, is a ball joint with the ability of movement in multiple directions (picture from healthpages.org).


A muscle that is relevant to the rider's ability to obtain a stable vertical seat is psoas major. Its origin is on the inside of the spine, lumbar vertebrae 1-5, and it attaches to the inside of the thigh bone. Psoas, among other muscles, are responsible for the flxing of the hip, that is to bend the torso towards the legs (the legs are fixed) or the legs towards the body (the trunk is fixed).

A shortened psoas muscle pulls the lower back forward and tilts the pelvis forward (increased lordosis). If the pelvis is tipping forward it means that the movement the head of the femour is impaired and that affects our ability to absorb the horse's movement.

A gentle stretch can help to overcome a shortened psoas muscle is the Alexander rest. During activity it can be helpful to think about letting your legs and torso "let go" of one another so that the legs can hang down from the torso and the trunk can have a direction straight upwards over the legs.

We may be content with less mobility than this three-year-old can produce but the potential is there...


"Riding turns 'I wish' to 'I can'."
Pam Brown

Thursday, 29 December 2011

Leg yield and shoulder in, part 2: the aids

The way I see it, the aids are the same for leg yield and shoulder in. In both movements the horse goes sideways with more or less angle, and with more or less pronounced flexion of the neck (see my previous post).

Order of priorities
When you teach your horse a new movement, or for that matter, when you introduce a new exercise to a rider you should follow this order:
1) The horse must be light in the hand (free to place its head and neck any way it wants), the rider must not hang or pull on the reins
2) The horse puts his feet more or less where you want (you have influence over the horse's balance), the rider can control the placement of the horse's feet
3) The horse, through the yielding of the jaw and relaxation of the poll and neck, lets its head fall into a more or less vertical position (the horse is in the form), the rider does know how to ask the horse for this yielding of the jaw and relaxation of the poll and neck

The hand is the primary aid
What I mean by the statement “the hand is the primary aid” is that the attention to the quality (ie lightness) in the contact between the rider´s hand and the horse´s mouth is always the top priority. It comes before everything else. To see the hand as the primary aid does not mean that I try to force the horse around with large uncoordinated gestures. Not at all, quite the opposite. To see the hand as the primary aid is to acknowledge that lightness between my hand and the horse's mouth is the main indication of the movement's quality in general.

I have previously written about how to educate the horse´s mouth and also how to influence the horse´s balance by the use of the hand.

The legs
Since the word “leg” is present in “leg yield”, it is of course easy to assume leg aids are necessary to perform the movement. Since only the angle in which the horse is travelling seems to differ between leg yield and shoulder in, the same could be true for the latter movement.

You can of course use your leg to ask the horse to move sideways. If you do, there are a few things you should keep in mind:
1) when you use both legs at the same time, it is a signal to the horse to move forwards
2) a single leg tells the horse that it will move sideways and not forwards
3) when using your legs, either together for forwards movement, or to move the horse to the side, the horse should not lean or push on the bit

A single leg can be used to ask the horse to move sideways. Spontaneously, I think most of us imagine that an increase in pressure from one leg will cause the horse to move away from that leg. This is one way to train the horse. But how much pressure is needed? A horse can feel a fly crawling on its skin, so the answer must be "not very much". Instead of focusing on increasing the pressure in the leg that is on the horse, you might be better off easing the pressure with the leg that the horse should move towards. If you pay close attention, you can feel the horse's barrel lifting your knee up in one sequence of the horse´s foot fall when stepping sideways. You can very easily lighten the contact of you leg against the horse´s side by aiding in the lifting of your knee at this very moment. Do not hold your leg up, but let it sink when the horse's barrel sinks and then lift it again in time with the horse's movements. If the horse does not perceive or understand your cue, stimulate the horse gently using a whip on the opposite side. And, of course, pay attention that your horse does not start to lean or push against the bit.

The weight
If you want to help your horse by using your weight, you want to place your weight in the direction of motion. This means that in a right shoulder in on a straight line where the horse moves to the left, your weight should also be placed to the left. Using your weight as an aid is done by extremely subtle means and it is easy to do too much.

Do nothing
Remember, when the horse does what you asked for, it is your job to do nothing, ie to be the best, non-interfering passenger you can be to your horse.

Thank You
Thanks to Mark Stanton of Horsemanship Magazine for checking my spelling and grammar! All other errors are my own.

Wednesday, 21 December 2011

Colic, part 2 - food to feed

There is a link between colic and the quality of the food a horse is given. Since colic is a serious condition for any horse I have taken the help of Sara Beckman with this posting on feed.

The horse is a roughage eater and the nutrients in the feed is made available to the horse in the fermenting process that occurs in the colon. The forage is largely grass and it comes in three forms: fresh (pasture), dried (hay) and acid conserved (silage)

Grass can be contaminated by soil due to heavy rain. Newly mown grass placed in a pile without aeration will soon take heat and harmful bacteria and mould is growing rapidly.

Hay is preserved by drying. The water content is about 16% (dry substans, 84%). When there is no free water micro-organisms can not grow. If the hay is brought in, or pressed into bales before it is completely dry the hay is quickly pestered with bacteria and mould. The same happens if the hay gets wet from leaks in the roof, if damp stable air passes through it or from moisture during the storage directly on concrete floor without an air gap (eg, on pallets) below.

Silage is preserved by a combination of acidification, compare sauerkraut or boston cucumber, and airtight storage. As the lactic acid-producing bacteria grow and provide an acidic, oxygen-free environment where unwanted - in which, for the horse harmful, microorganisms can not grow. Silage is a generic term for ensilage, 65-75% water (dry substance 35-25%), and haylage is drier 45-60% water (dry substance 55-40%). Haylage is most commonly used for feeding horses. Hygiene requirements are however equally regardless silageform.

If the grass is too dry when the bale is pressed, the beneficial bacteria has difficult to grow and preserve the gras. If the field is harvested during blooming the stalks are tough and it's hard to pack the bale and it remains a lot of air in the bale - that benefits the harmful organisms' growth. When the bale is opened or if there are holes in the plastic air will come in and the bacterias can begin to grow. If you see a lot of the coarse straw in bloom in the bale - feed it more quickly to "get ahead" of the mould.

A good silage should smell slightly sour - as sauerkraut. If it has a sweet-sour or sharp smell to it, or if it is warmer than the outside temperature that indicates a mishap in the fermenting process and harmful organisms thrive.

In harvesting a farmer can affect the quality a lot! By drying the hay in the barn it is preserved better. The ensiling process can be accelerated and the process ensured by: baling hay with the right moisture content, if necessary, cut the raw material, acidification of the grass if it is dry or coarse, rolling the bales tightly, wrapping with many layers of plastic to seal the bale.

Generally speaking seven adult horses is needed to eat from a haylage bale after it has been opened to be able to eat faster than the feed is destroyed by air. In northern Sweden you can have fewer horses per bale during winter time, if it's minus degrees (below freezing) when opened.

In forage with visible mould, or smells "dusty" or have gained heat there are usually very high levels of unwanted organisms. Feed it quickly or discard. Which is most expensive? To discard the bale or to call the veterinarian because of colic?

Problems with colic may occur if forage contains readily soluble protein and low fiber content - it gives the wrong balance and a disturbed fermentation in the colon. That quality occur with forage that is harvested during periods of heavy rain or when you take an extra harvest in late autumn. The feed can be recognized by a high content of green leaves and almost no grass stalks. To feed should not pass too quickly through the intestines and cause bloating, it must be combined with an extra feed of straw daily as fiber supplement.

If the gut flora is disturbed and extra gas is produced and if bowel movements are not stimulated enough by fibers then the transportation of gas is impeded and that can lead to colic. This can be caused by either to much starch in the diet from oats or fabric feed mix or too little roughage in the diet.

A horse should eat at least 1.2 kg hay or 1.5 to 1.7 kg haylage (depends on water content) per 100 kg horse on a daily basis. Most ponies/horses ridden 1-2 hours per day feeds well only on roughage + minerals + salt in the summer. (Studies at the University of Agricultural Sciences in Sweden has shown that even trotter in full competition can be fed only roughage and reach full performance level).

Thursday, 15 December 2011

Leg yield vs Shoulder in

I received a question the other day: “I would very much like an explanation with videos of how leg yield is performed”. Thank you for your question, Johanna! I was about to write about leg yield and shoulder in anyway since, after I posted the two videos with me and my horse doing shoulder in, I've learned something very interesting about the modern perception of the difference between leg yield and shoulder in. This blog entry will deal with the performance of the horse, that is what the horse should do, and in my next blog entry on the 29 of December I will tackle the topic of how the rider should ask the horse to move sideways.

According to the modern theory of riding, a horse should be straight in the spine in leg yield except for a very small bend in the neck (away from the direction of motion). When the horse is straight in the trunk, it will cross the inner front leg in front of the outer front leg, and also the inner rear leg in front of the outside rear leg.


Video of leg yield


However, in a shoulder in, the horse should be evenly bent through the whole spine. The result of this will be that the horse is moving sideways only crossing the front legs, not the hind legs. The inner hind leg will not cross in front of and over the outer hind leg, but it will be placed forward and in front of the outside hind leg so that it is placed under the horse's body where it will carry a maximum amount of the horse's weight. What you can see is that the horse is moving on three tracks, i.e. the inner rear hoof and the outside front hoof are travelling on the same line.


Video of shoulder in


But wait a minute. Can the horse bend evenly through the whole spine? No. Anatomical studies of the horse's spine clearly show that the horse has very limited ability to bend through the spine any further back than the withers.

In times of confusion it is always a good idea to go back and read about the original ideas, so therefore I turned to de la Guérinière. He was the first person to describe how to ride a shoulder in on a straight line, he did so 1731:

“Thus, once a horse has learned to trot freely in both directions on the circle and on the straight line, to move at a calm and even walk on these same lines, has become accustomed to executing halts and half halts and to carrying the head to the inside, it is then necessary to take him at a slow and slightly collected walk along the wall and place him such that his haunches make one line and his shoulders make another. The line of the haunches must be near the wall and the line of the shoulder must be about a foot and a half to two feet away from the wall, while keeping the horse bent in the direction in which he is moving. In other words, to explain myself more simply, instead of keeping a horse completely straight in the shoulder and the haunches on the straight line along the wall, it is necessary to turn his head and shoulders slightly inward toward the centre of the school, as if one actually wanted to turn him, and when he has assumed this oblique and circular posture, one must make him move forward along the wall while aiding him with the inside rein and leg (he absolutely cannot go forward in this posture without stepping-over or “chevaler” - the front inside leg over the outside and, similarly, the inside hind leg over the outside). This is easily seen in the figure of the shoulder-in which will make this still more visible.”

Part of the figure referred to in the quote is shown here:


The text and pictures describe, as far as I can tell, a horse that crosses both the front and hind legs. So, the father of modern riding describes a movement he calls shoulder in where the horse crosses the inner front and inner hind leg with the goal of producing suppleness in the horse since the horse is using the joints in the legs differently from when he travels on one track, whether that is straight or on a circle.

From what I can tell, whether or not the horse will cross the inside hind leg over the outside hind leg has more to do with the angle in which the horse is moving sideways, rather then if he is bent in the spine or not. A sufficiently small angle and the horse will bring the inner rear leg more forward under the body than crossing over the outer hind leg.

These ideas only apply if the horse moves on the straight line. As soon as the horse starts performing shoulder in on a curved line, both the inner front and the inner rear leg will cross over the outer ones.

Picture from Philippe Karl's “Twisted truths of modern dressage” showing sideways movements on circles and voltes:


Video showing shoulder in on the volte


Compare the sequence of footfalls as Yeats moves sideways in shoulder in on the volte with the sequence of footfall when moving in a side pass. When the front legs cross, the hind legs are far apart and vice versa.

Video showing side pass


My conclusion from this study of leg yield and shoulder in is that whenever the horse moves sideways crossing both the front and the hind legs this is suppling the horse, while a sideways movement when the horse is not crossing the hind legs but rather takes it forward and under the horse's belly is preparing the horse for collection.

Thanks to Mark Stanton of Horsemanship Magazine for proof reading! All remaining errors are my own.

Thursday, 8 December 2011

Colic - part 1: Anatomy

It is ironic that I planned to dedicate today's post to colic and it turns out that my youngest son wakes us all by vomiting in the bed last night. The situation has now stabilised so that I can sit down at the computer for a while.

A difference being a human, compared to being a horse, is that we can get rid of disturbances in our digestion system at both ends but for the horse there is only one way out at the hind end.

To get all the facts in the right place, I have taken the help of Sara Beckman, farm agronomist. This will be a long posting, with lots of text and images. For the horse colic can turn into a life threatening condition and with that in mind this is given the place needed.

Colic is a generic term for painful conditions in the horse's belly. To understand why a horse may get colic, you need to know a little about what the horse's digestive system looks like and what happens in the digestive process.


(grovtarm=colon, tunntarm=small intestine, lever=liver, blindtarm=caecum)

The intestinal package fills the entire abdominal cavity behind the ribs on the horse and is separated from the chest cavity (where we find the heart and lungs) of by the diaphragm.


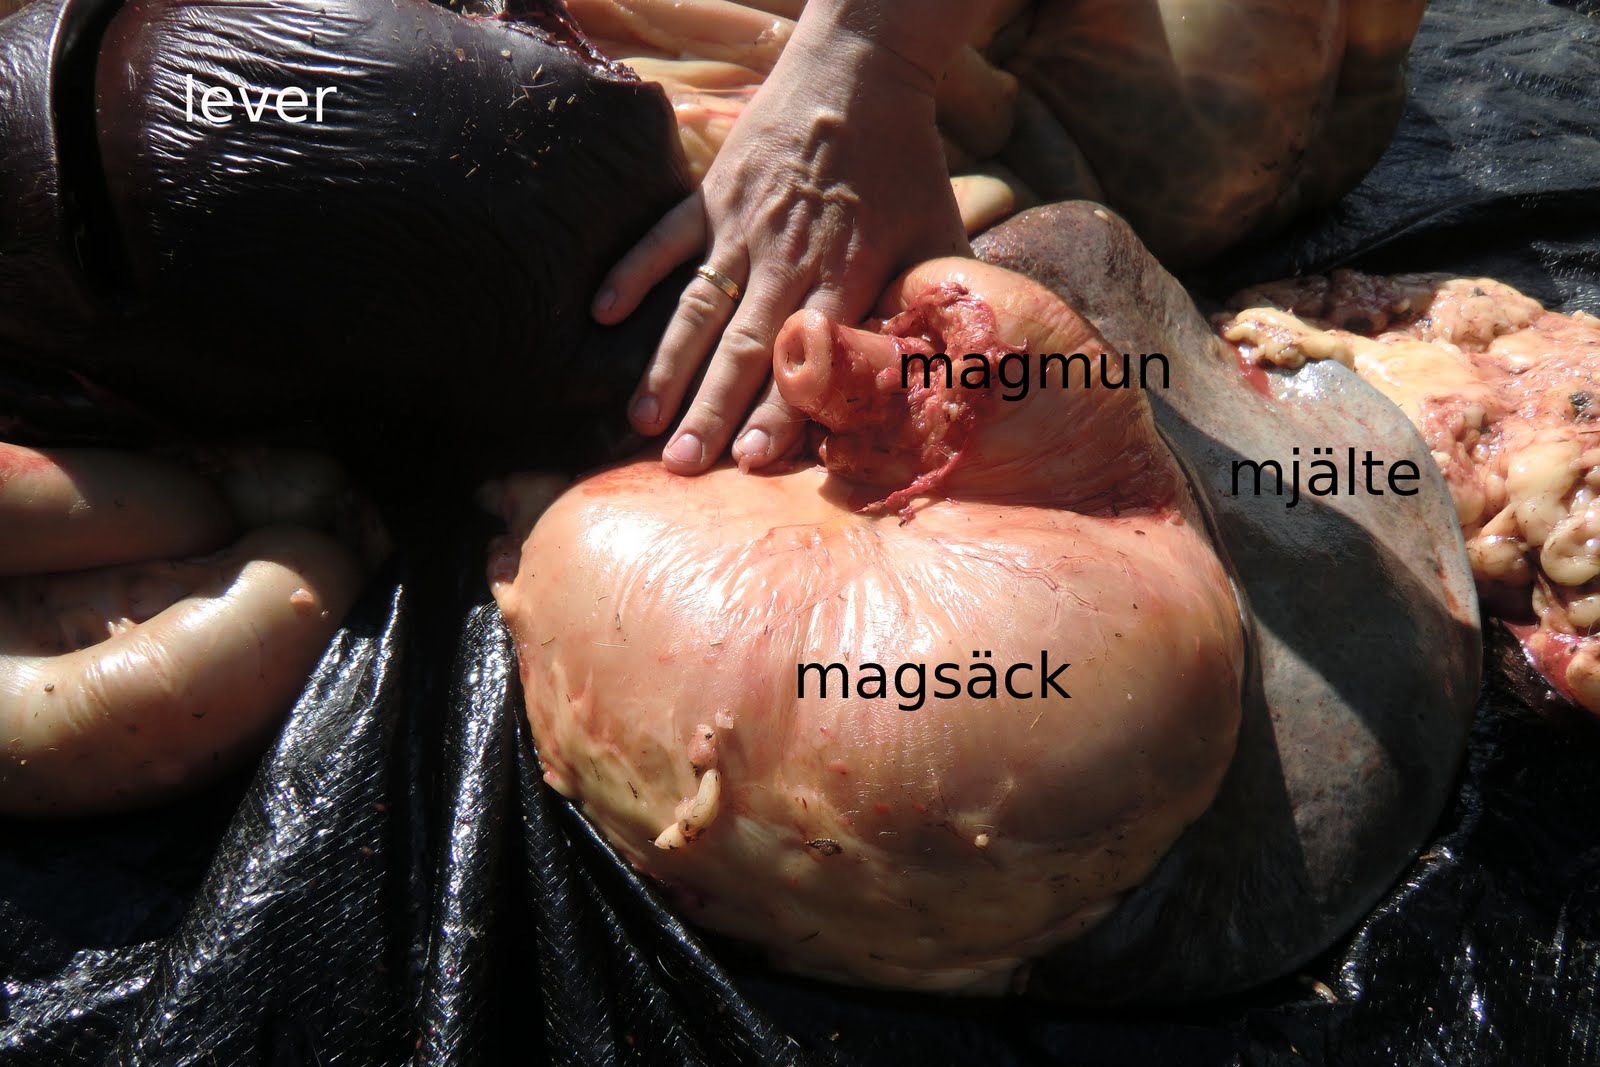
(magmun=orifice of the stomach, magsäck=stomach, mjälte=spleen)

The stomach of a horse is relatively small and can hardly be stretched. It is suitable for an animal that is constantly eating (12-16 hours per day). The muscle between the gullet (oesophagus) and stomach is very strong and the horse can not burp or vomit, everything they eat must pass through the intestine. The feed passes slowly from the stomach into the intestine as it is processed. If the horse eats too much of feeding that can swell, like oats or sugar beet pellets that has not been soaked enough, it can get cramp in the stomach. (colic due to over eating)


(tarmkäx=mesentery)

To avoid the intestines to move about in the abdomen, they are conected towards the spine by the mesentery. In horses mesentery is very long and loose and the small intestine can move about more than in many other animals. The small intestine is 16-24 feet long and absorbes easily soluble substances such as fat, simple carbohydrates, minerals and protein into the blood. If the feed contains toxins from harmful micro-organisms or substances too much gas can be produced with abnormal bowel movements as a result. If sand from contaminated feed or pasture is ingested it can stop the flow in the intestine and bowel movements are affected. (sand colic) In a horse with colic due to a stop, cramp or gas in the small intestines the gut literally "twist around itself", ileus, and if the blood supply is restricted the twisted part of the intestine dies fast - a very serious condition for the horse that can lead to death.


The horse's caecum (1 m) and colon (6-8 m) ads up to the largest volume in the abdomen (over 100 l). (Together they can fill half a bathtub.) Here, most of the degradation of forage is done with the help of microorganisms (bacteria, yeasts, fungi). The horse is completely dependent on their intestial flora to digest their feed - microbial waste products (proteins and fats) becomes food for the horse. Large amounts of gas is formed during the process that the horse has to let off.


The picture above shows the size of the colon. The horse can get colic from eating a diet rich in starch (long carbohydrate) with lot of concentrated feed, oats or barley and/or too little roughage. To much starch can lead to a growth of the gas-forming bacteria and to little roughage lessens the bowel movements. When the wrong micro-organisms grow you get a combination of improper intestinal flora with an increase in gas production and bad bowel movements that do not transport the gas quickly enough - the abdomen swells with great pain as a result. (gas colic or colon colic) A disturbed intestinal flora can also make the horse suffer from diarrhea. To restore the intestinal flora it may be necessary to give the horse freeze-dried lactic acid bacteria suitable for horses and/or live yeast.

A horse that eat enough of good quality roughage has good intestinal flora and bowel movements. If you place your ear close to the horses belly you should hear the rumbling sound of bowel movements and fermenting processes. The shape of the abdomen depends on the strenght of the abdominal muscles, the size and shape of the belly does not affect the horse's movements. A digestion that works fine is revealled by the look of the residual product's, solid ballshaped dung and a horse that is dry around the anus and under the tail.

A very common cause of colic is due to poor feed hygiene. Part 2 will focus on feed quality and hygiene.

Thursday, 1 December 2011

Combing the reins

it is easy for the reader to see that a horse that is obedient to the hand is one who follow all of its movements and that the movements of the hand through the reins cause the bit to act in the horse's mouth.”

This is a quote by de la Guérinière. It is from chapter 7 in his School of Horsemanship where de la Guérinière discusses the rider's hand as the primary aid.

For the horse to follow the rider's hand, the horse can not fear the bit nor withdraw from it. The horse must, as the popular saying goes, seek the bit. Now, the perfectly schooled horse should never lean on the bit, resist a small lifting action of the rider's hands, nor hesitate to follow the bit forward, down and out. The horse should follow the bit both up, to the left, to the right as well as down.

Some horses do however withdraw from the connection with the rider's hand, which may cause the horse to either go behind the bit, or nervously throw it's head up. In both cases I have had great success with a technique called “combing the reins”. This technique teaches the horse that the rider's hand is nothing to fear. It is quite easy to do but hard to explain so Maria volunteered to demonstrate it on her three year old gelding Amaretto. If you look closely you can see that Maria is currently introducing Amaretto to the mysteries of being a riding horse using a bitless bridle but the technique is just the same weather you are using a bit or not. Look at Maria's hands, she is gently combing the reins with relaxed fingers and when Amaretto stretches forward, down and out with his nose, head and neck she lets the reins slide through her fingers.


For this technique to work you need to have plain leather reins. You should take care not to grab hold of the reins no matter what the horse does with its head (unless the horse takes off, of course!). Start out in standing still like on the video, and progress to walk. For some horses this work is best introduced when walking back to the barn after a nice ride out doors. Since most horses have a tendency to walk energetically towards home, it is usually easier to have them take contact with the bit and the rider's hand in this situation. Praise your horse when he does what you want, and take care he doesn’t start pulling the reins out of your hands! Too much of any one thing is not necessarily better.